


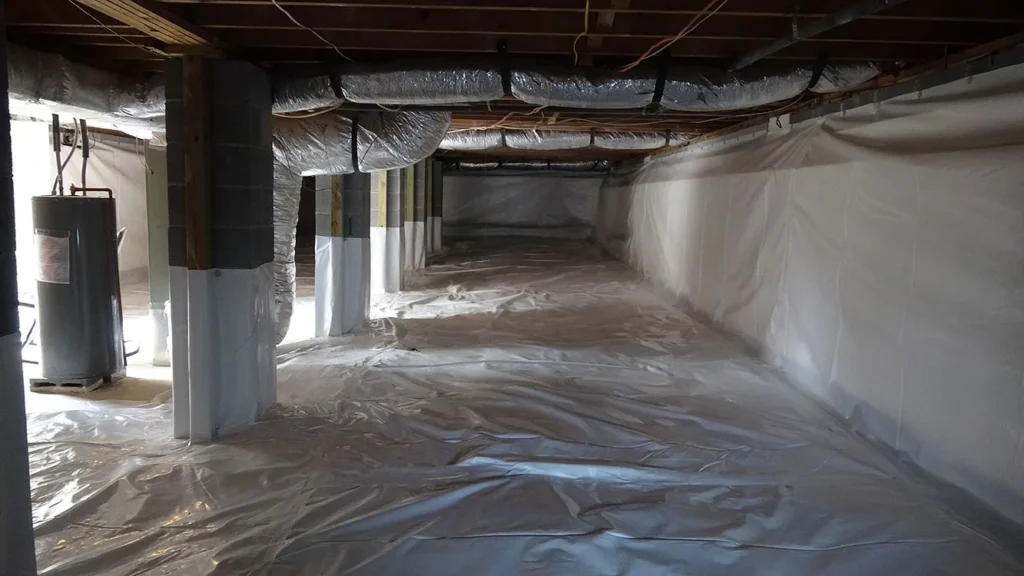
Coastal weather and high humidity around Wilmington can turn a crawl space into a moisture trap. Before choosing any fix, it pays to figure out where water and vapor are coming from and how they move through the structure. An evidence-based plan lasts longer than a quick patch. The checks below help you separate ground moisture from roof runoff, spot warning signs inside the crawl, and match the right tools to the real problem. They also highlight where simple exterior work solves most of the issue and where you may need drainage, a reinforced vapor barrier, or controlled dehumidification.
-
Trace How Water Reaches the Crawl Space
Start after a hard rain. Walk the perimeter and look for soil that’s washed against vent openings, a low corner where puddles linger, or splash marks on foundation walls. Inside the crawl, standing water at the footing, muddy footprints on thin plastic, or efflorescence on block piers point to bulk water intrusion rather than just humidity. Drips from an HVAC condensate line, a disconnected downspout elbow, or an irrigation head aimed at the foundation can add gallons to an already damp area. If sources are unclear, a dye test in surface water or a smoke test at penetrations can help, and a waterproofing service for homes in Wilmington can perform these without guesswork.
-
Fix Exterior Contributors: Gutters, Downspouts, and Grading
Roof runoff is a frequent culprit. Clogged gutters overflow directly beside foundation vents, saturating the band joist and wicking through mortar joints. Downspouts that end near the foundation concentrate flow at one spot; extensions that carry water several feet into the yard are inexpensive and effective. Splash blocks help with light rain but seldom handle a day-long storm. If the yard slopes toward the house, a simple regrade to create a positive slope away from the foundation often reduces crawl space moisture before any interior work begins.
Look closely at driveway edges and walkways that create channels toward the foundation. Soil settled below a deck can hide depressions that funnel water under the house. Dryer or bath fan vents should exhaust outside, not into the crawl space where they add both heat and moisture. Seal hose bib penetrations, cable entries, and gaps around utility lines with exterior-rated sealant so wind-driven rain can’t ride those paths indoors.
-
Use Interior Clues and Readings to Guide the Plan
Inside the crawl, your senses and a couple of simple tools go a long way. A hygrometer can confirm high relative humidity, which encourages condensation on cold metal ducts or on nails sticking through the subfloor. A pin-style moisture meter on the sill plate or a joist face can reveal persistently damp wood that invites decay. Look for cupped hardwood floors above, falling fiberglass batts, rusted duct straps, or dark staining at the rim joist as signs that humidity is chronic, not occasional.
Check the condition of any ground cover. Loose, torn, or thin plastic often leaves bare patches of soil that release vapor all summer. If seams aren’t sealed and the liner isn’t mechanically fastened up foundation walls or around piers, humid air can enter under the edges and condense on cooler surfaces. Puddling after rain points toward drainage needs, while no puddles but consistently high humidity suggests you need air and vapor control. Each pattern leads to a different set of fixes.
-
Match Fixes to Findings: Drains, Liners, and Dry Air
If you see standing water or water lines on piers, consider managing bulk water first. An interior perimeter drain set at the footing and pitched to a sump basin collects groundwater before it spreads across the crawl. A reliable sump pump with a check valve and a discharge line that terminates well away from the house reduces hydrostatic pressure at the wall. In clay-heavy or flat lots that hold water, these measures are often non-negotiable for long-term performance.
When vapor is the main issue, a reinforced vapor barrier with sealed seams, taped columns, and secure attachment up the walls creates a continuous membrane that blocks ground moisture. Adding drainage matting beneath the liner improves drainage paths toward the drain in areas with intermittent seepage. If the crawl space will be sealed, close vents, air-seal the rim joist, and install a dehumidifier sized to the volume of the space. This combination stabilizes humidity and helps protect subfloor framing and ducts. A trade-off to consider: full encapsulation with dehumidification offers tighter control and can support better indoor air quality, but it adds equipment that requires power, a condensate drain, and routine filter cleaning, whereas a drainage-only approach may be simpler but leaves humidity swings unaddressed.
-
Common Missteps That Backfire
Some fixes fail because they skip the sequence. A frequent mistake is installing a dehumidifier while leaving vents open; humid summer air replaces what you just dried, and the unit runs constantly. Another is lying thin plastic loosely across the ground. Without sealed seams and mechanical fasteners, air pumps under the liner each time wind moves through a vent or the HVAC turns on, and moisture rides with it. Sealing vents before addressing bulk water can trap puddles under the liner and increase odors. Covering mold-stained wood with a liner or foam board without proper cleaning also ignores the source and can spread the problem across hidden surfaces.
Two real-world scenarios show the difference sequence makes. In one, short downspouts dumped water beside a low back corner; the crawl flooded after each coastal storm. Extending downspouts, regrading that corner, and adding an interior drain to a sump at the low point kept the area dry without a dehumidifier. In another, there were no puddles, but floors cupped each July and ducts dripped. A sealed liner up the walls, closed vents, rim-joist air sealing, and a dedicated dehumidifier stabilized humidity and protected the subfloor. Both homes “fixed moisture,” but each needed a different playbook.
-
After the Work: Simple Checks That Keep It Dry
Waterproofing is not a set-and-forget step. Test the sump by lifting the float before heavy-rain seasons and confirm the discharge line is clear and pointed away from the house. Clean the dehumidifier filter as often as the manufacturer suggests and verify its condensate drain isn’t blocked. Place a small remote hygrometer in the crawl so you can see humidity trends without opening the access door. Walk the exterior after yard work or storms to make sure downspout extensions stayed connected and splash doesn’t erode the grade you just improved.
Inside, repair any punctures in the liner and re-tape any seams that lift. Replace missing weatherstripping on the crawl space door to keep humid air and pests out. If you plan additional work, such as wiring or plumbing, ask the contractor to protect the liner and reseal any cuts. Periodic inspections help catch small issues while they are cheap to correct, and they safeguard the investment you made in keeping the crawl space dry.
